How to join split designs instructions
How to join split designs
We have the pleasure to introduce the basic instructions to stitch Our split oriental designs. Donna Arruda (one of our invaluable customers) tried our split designs and wants to give embroiderers, who didn't use split designs before, a few hints and tips to get a professional high quality embroidery. Many thanks for her kind support.
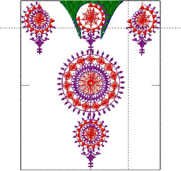

The split
Design in order before stitching (bottom - Center - Top)
"I have found the best way to assemble the large split designs
is to first make a template of all the parts on transparency film or
vellum paper. These templates are valuable tools when assembling the
split designs.
Template and mark the fabric first for all sections, laying out
the entire design. These can later be fine tuned when re-hooping for
the next section.
Then, hoop and embroider the first section. Within the design part, there is an outline stitch, that embroiders first. This guide line will help you center and place the next hooping. On the designs that I tried this outline stitch also fell on the center seam of the neckline. When rehooping for the next section, take the template and place it over the design, you can now fine tune the placement of the second hoop and check for accuracy. Accuracy is a must. These designs overlay from one hooping to another, not just butting up to each section. Each time you hoop a new section, part of the previous section will be in the hoop.
When
they are split, sections of designs are split, not necessarily in a
straight line. For example, you may have a three concentric circles
of red, green and blue. When split, part of each color is split. When
you reassemble them, you must allow for those circles to match up again,
to form red, green and blue circles.
When you hoop the new section, to check for accuracy, I thread my machine
with the same color thread as the fabric, first. I then find a section
of the design, from the previous hooping that I know must line up perfectly
with the section 1 am about to embroider. I let my machine slowly take
a few stitches to make sure the design will stitch up and match. For
example, T check with the circle to make sure when it stitches out it
will form a perfect circle. Threading with the same color as the fabric
allows these test stitches to be invisible when I finally match accurately.
When you are happy that
everything will line up, go back to color 1 and start embroidering.
Always remember to stitch out the sections in the order they are assigned.
If you don't sew them in that order the designs will not connect properly.
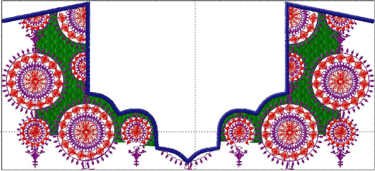
Each design section interlocks like a jigsaw puzzle. Now You can see the full
stitched design in one unit
A
few hints:
I tested the designs on a piece of felt. It was a nice heavy fabric
and it gave me a chance to place the designs over various dress patterns
to see where and what kind of neckline I could use them on.
Testing
also gave me chance to try different threads. Some of the more intricate
designs worked well with 40 wt. rayon. Other larger ones did beautifully
with 30 wt. cotton.
Most of all have fun with it. I don't think there are too many commercial digitizers that will split such a large design. 1 was amazed after 1 embroidered the first large design. It was around 350 x 400 finished, you couldn't see where they were joined. I couldn't believe this came out of my "little embroidery machine"