Tutorial For small collar 014
Design scollar014 is easy geometric design to construct and adapt to different yoke and dress front styles. You can make it smaller or larger to fit any size dress front. Once you get the "pattern" Of the layout, You can adapt it to any area.
1- As a rule, you should follow with any design is that TO Draw A template for this design before going to stitch it. Make a paper template or sew out a design unit on a piece of scrap fabric or felt, to use as one. The template will help you to position the design units perfectly.
2- To lay out the geomtery and symetry of the design,draw a long horizontal accross your center seam line. Each larger design unit is 91.8mm square. The black outline stitches on the larger design unit will line up, matching notches and touching each adjacent side, Starting at Center seam and measure 46mm (the half of the design unit) to the left and the right of the center seam. This will be your center marks for the first two design units.
3- repeat the lerge design unit by marking 91.8 (92) from the center of the adjacent unit which you did in the previous step. Again the black outline stitches should touch and the notches match. Using the outline stitches first allows to check your position for accuracy when rehooping for the next design unit. You can use these measurements for both vertical and horizontal design placement.
4- To Place the smaller design unit (scollar014a), draw another horizontal 37mm in parallel with to the first horizontal line crossing center seam line. Each smaller design is centered between the two larger design units. by using the black outlines stitches of the larger designs units. Using the black aligning stitches where the two larger designs sides touch, draw a vertical line to the next 37 mm horizontal line which you draw before. The intersection is your center mark for scollar014a. (To check for accuracy, the notches on either sides of the smaller design will fall on the lower aligning line from the large design unit. The opposite notches of the smaller designs will fall on the aligning lines where the two larger design meet. See how the black aliging stitches fall.
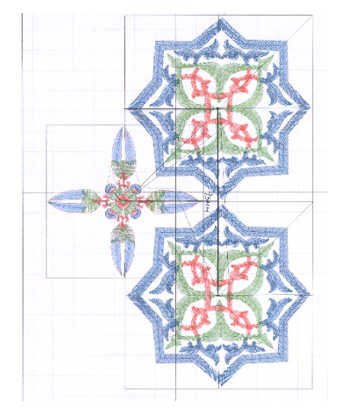
5- The next small center will be 92mm from the first small center. This center will be at the point where the corners of the black of outlining stitches of the large designs units meet
6- Tip : Using these guidelines will allow to build and customize this design. Knowing how the outline stitches work and intersect lets you know before you embroider the design, how accurate your placement is. Youcan stitch the outline first, check for accuracy and move your hoop accordingly. These stitches are loosely sewn and easy enough to remove and restitch again after repositioning. The black outlining stitches and guide work both on the horizontal and vertical placement of the design motif.
